When markets become emotional or overheated, price action does not always follow typical, orderly patterns. In these situations, a structure known as the Bump and Run pattern can provide important clues about where the current move may be running out of steam. This pattern shows when sharp price spikes are likely to lead to a trend reversal, and how traders can use these signals to anticipate the market’s next move.
If you are looking for a simple way to understand price behaviour better and identify more precise entry and exit zones, this pattern is worth learning.
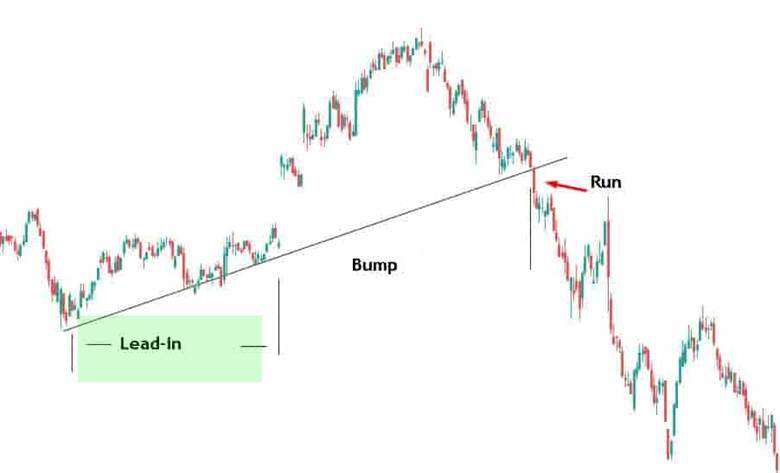
- The Bump and Run pattern helps traders spot sudden, abnormal price moves early and identify areas where the probability of a trend reversal is higher.
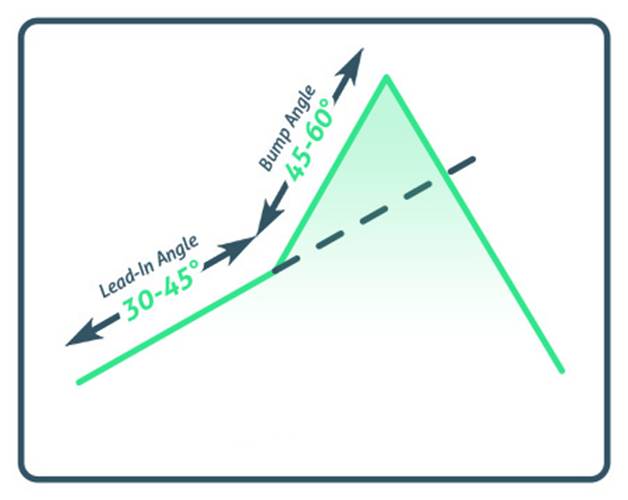
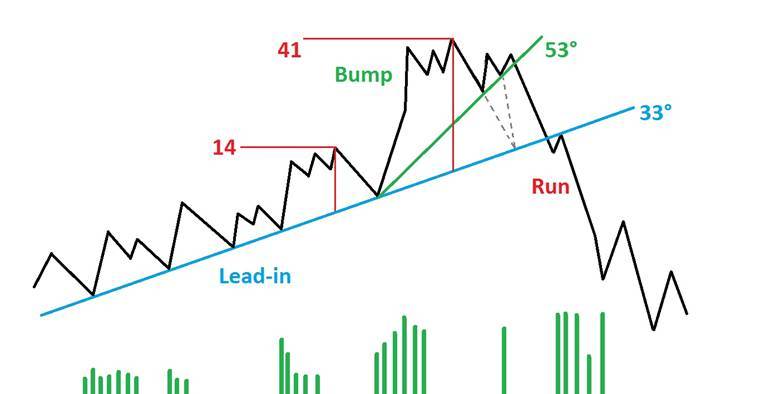
- The reliability of the pattern depends on specific criteria such as the slope of the price move, the intensity of the spike, and trading volume. These objective factors often make it easier to recognise than some more complex chart patterns.
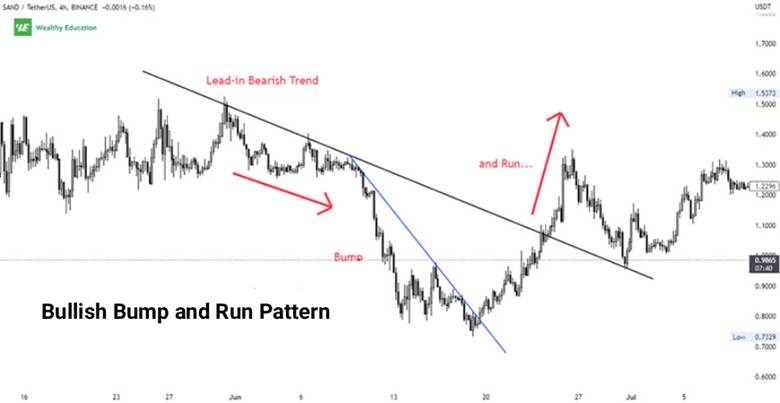
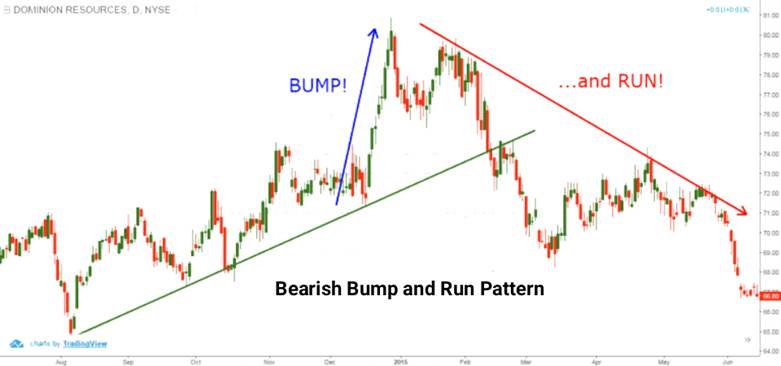
- The Bump and Run pattern is not limited to a single timeframe and can be applied to both short-term and long-term charts.
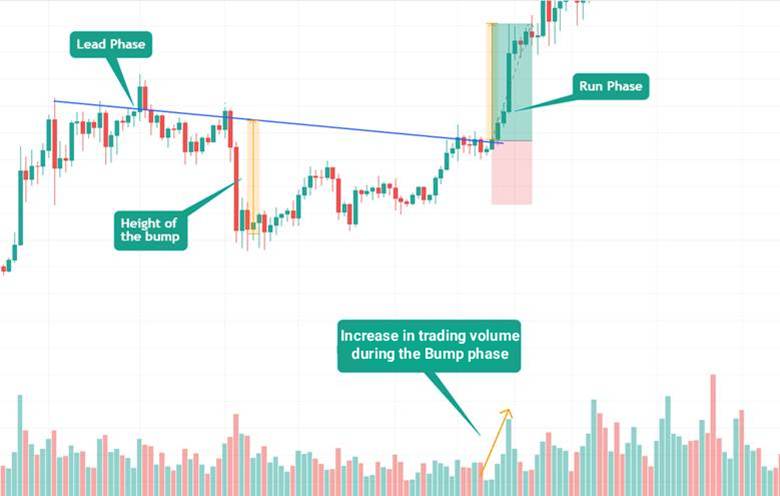
- Analysing volume together with the pattern is crucial for confirming whether the reversal signal is credible.
What Is the Bump and Run Pattern and How Is It Used?
Sometimes a market trend does not evolve as expected, and abnormal price swings appear on the chart. In these conditions, the Bump and Run pattern can signal that an existing trend is close to reversing. This pattern was first introduced by Thomas Bulkowski in 1999 and has since become one of the recognised tools in technical analysis.
By using this pattern, traders can identify the potential end of a trend and the start of a new move, and apply it in markets such as equities, forex, and cryptocurrencies. Its importance lies in the fact that it is a reversal pattern, helping traders define potential entry and exit points with greater precision.
What Is the Structure of the Bump and Run Pattern?
The three-phase Bump and Run pattern is usually described as Lead-in, Bump, and Run. By identifying each phase, analysts can anticipate the market’s likely direction. Below is a simple breakdown of each phase.
Lead-in Phase (Trend Initiation)
In this phase, the price moves within a relatively moderate trend either upward or downward with rational, calm fluctuations and no signs of market excitement. The trendline drawn during this stage typically has a slope of about 30 to 45 degrees. This slope reflects a stable, orderly trend that is clear and not rushed.
Using this trendline helps analysts create a solid framework for identifying the continuation of the move. This phase plays a particularly fundamental role in price-action–based analysis.
Bump Phase (Sharp Price Acceleration)
In this phase, the price suddenly accelerates and moves with a steep slope, typically between 45 and 60 degrees. This sharp spike is usually driven by market excitement or speculative activity, and traders observe a strong but temporary movement.
One key point in this phase is that the vertical distance between the peaks of this spike and the Lead-in trendline must be at least twice the comparable distance seen in the initial phase. This requirement indicates the intensity and instability of the price surge.
Run Phase (Reversal and New Trend Development)
After the Bump phase ends and market excitement fades, the price moves back toward the original trendline and breaks through it. This breakdown marks the beginning of the Run phase, which can trigger a strong reversal.
Once this break occurs, prices typically move in the opposite direction of the prior trend, forming a new market trajectory. At this stage, traders identify entry and exit points with greater precision.
Q: How can analysing the slope transition between Lead-in and Bump phases enhance trade precision?
A: Tracking the shift from the moderate Lead-in slope (30–45°) to the steeper Bump slope (45–60°) helps traders anticipate trend exhaustion and time entry or exit points more accurately.
Pro Tip
According to Investingoal, one reason this pattern is so powerful is that the Bump phase represents a climax of market euphoria that occurs just before the real reversal begins. The way the market reacts to the surge in volume during the Bump to the start of the Run phase often serves as a handy trigger for taking a trade.
The Role of Trading Volume During the Formation of the Bump and Run Pattern
When examining the structure of the Bump and Run pattern, one of the most important factors that strengthens its reliability is trading volume. During the stage when price suddenly accelerates and enters the Bump phase, rising volume typically signals elevated market excitement.
Later, in the Run phase, when the original trendline is broken, high volume acts as a strong confirmation and helps traders more accurately determine the direction of the next move.
Many traders use indicators such as On-Balance Volume (OBV) or Chaikin Money Flow to track capital inflows and outflows more precisely. Paying attention to these details not only enhances the validity of the pattern but also plays a key role in risk management, enabling traders to make decisions with greater confidence.
Q: Can algorithmic or high-frequency trading affect the reliability of the Bump and Run pattern?
A: Yes. Automated trading can amplify the Bump phase or create false spikes, requiring traders to cross-check patterns with volume and multi-timeframe analysis.
Key Insight
According to Warrior Trading, trading volume is essential for confirming the Bump and Run pattern. Volume is typically low during the initial trend, but spikes sharply when the Bump appears on the chart.
Types of Bump and Run Patterns
This section introduces the two main forms of the Bump and Run pattern: bullish and bearish. Each structure appears under specific market conditions and provides different signals for traders. The bullish version helps identify buying opportunities, while the bearish version is useful for anticipating price declines.
Bullish Bump and Run Pattern
The bullish version forms at the end of a downtrend. After a period of steady price decline, an abnormal, sharp price spike occurs. This spike marks the beginning of a potential upward reversal. Once the price breaks above the descending trendline, a new bullish trend typically develops.
With this structure, traders can identify attractive entry opportunities and take advantage of the trend reversal to the upside.
Bearish Bump and Run Pattern
In contrast, the bearish version forms at the end of an uptrend. After a period of gradual price appreciation, the market suddenly accelerates upward with a steep slope. Following this sharp rise, a reversal begins, leading to a breakdown of the ascending trendline.
This reversal generally pushes the market into a new downward trend. Correct identification of this bearish Bump and Run pattern can provide traders with useful opportunities to exit positions or enter medium-term trades aligned with the new direction.
How to Identify the Bump and Run Pattern on a Chart
To correctly identify the Bump and Run pattern on a chart, you must first examine the slope of the trend. In the initial Lead-in phase, the trendline typically shows a slope of 30 to 45 degrees. Then, in the Bump phase, the price advances with a much steeper slope around 45 to 60 degrees, and this change in angle reflects a sudden increase in market pressure.
A key requirement is that the height of this spike should be at least twice the size of prior swings for the pattern to be considered valid.
During the Run phase, once the original trendline is broken, confirming volume helps determine whether a reversal or continuation of the new trend is likely. This accurate detection is a highly useful tool for trading decisions, and understanding it naturally improves the precision of your technical analysis.
Advantages and Disadvantages of the Bump and Run Pattern
The Bump and Run pattern can be a powerful tool for spotting early signs of a trend reversal, but, like any technical model, it has its strengths and limitations.
Advantages of the Bump and Run Pattern
- Identifies high-probability reversal zones
The pattern highlights moments when price action becomes overstretched and unsustainable, especially during the Bump phase. Because this spike often reflects market euphoria or panic, the subsequent break of the trendline provides a meaningful clue that a reversal is likely underway. - Uses clear, objective criteria
Unlike some chart patterns that depend heavily on subjective interpretation, the Bump and Run pattern relies on measurable elements:
- the slope of the Lead-in trendline,
- the steeper angle of the Bump,
- and confirmation from trading volume.
These quantifiable features help reduce ambiguity and make the pattern more systematic.
- Works across multiple timeframes
The structure can appear on intraday charts or on long-term weekly and monthly charts. This flexibility makes it valuable for a wide range of trading styles, from day traders looking for short-term moves to swing traders and long-term investors monitoring major trend shifts.
Disadvantages of the Bump and Run Pattern
- It is relatively rare in real-market conditions
True Bump and Run structures do not appear often because they require a specific combination of trend slope, sharp price acceleration, and a clean trendline break. Traders must be patient and experienced enough to distinguish real patterns from look-alikes. - Vulnerable to false breakouts
The Run phase relies on a break of the original trendline. However, markets frequently produce fake breakouts, especially during volatile periods. A false break can easily lure a trader into a position just before the price snaps back. - Requires disciplined risk management
Because the pattern forms after a sharp price spike, volatility is usually elevated. If the reversal fails or the interpretation is incorrect, losses can accumulate quickly. Clear stop-loss placement and position sizing are therefore essential when trading this setup.
Comparing the Bump and Run Pattern with Other Reversal Patterns
In technical analysis, understanding the differences between chart patterns helps improve decision-making. Below, we compare the Bump and Run pattern with two common reversal formations.
Difference Between the Bump and Run Pattern and the Head and Shoulders Pattern
The head-and-shoulders pattern has a clear wave-like structure with three distinct peaks or troughs (two shoulders and one head), and its overall shape resembles a human torso.
By contrast, the Bump and Run pattern has a simpler design based on angles and slopes. It is more geometric in nature and focuses mainly on rapid price acceleration.
Both patterns are useful in price action analysis, but their emphasis is different:
- Bump and Run focuses on changes in slope and the break of the trendline.
- Head-and-shoulders highlights key price levels and the structure formed by its three main points.
Difference Between the Bump and Run Pattern and Double Top/Double Bottom Patterns
In double top and double bottom formations, the market forms two peaks or troughs at roughly the same level. A reversal is confirmed when, after the second test, the price fails to break through the neckline.
In the Bump and Run pattern, however, we see a strong price spike (a sharp, sudden move) followed by a trendline break. This structure reflects a sudden shift in market pressure rather than a repeated test of the same price level.
To deepen your understanding of chart patterns, studying the concept of a rejection block can also be very helpful.
Key Insight
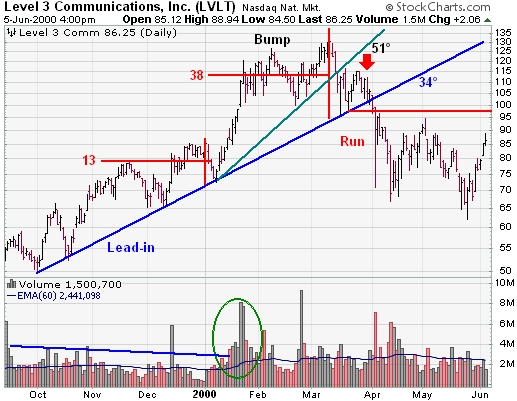
According to StockCharts, in some cases, the Bump phase does not form a single, clean peak. Instead, it may develop as a double top or a series of lower highs. After this structure forms, the price begins to decline and approaches the original trendline, completing the right side of the Bump and initiating the Run phase.
Conclusion
Properly understanding the Bump and Run pattern can give traders a significant edge, as this formation often appears at moments when the market is preparing to reverse direction. Recognizing its three-phase structure and monitoring trading volume enable more accurate identification of reversal signals.
However, this pattern should not be used in isolation. It is most effective when combined with other technical analysis tools and a disciplined approach to risk management. When these elements are used together, traders can make more informed decisions and increase their chances of success in the market.