


In trading based on order flow and Smart Money price action, understanding the behind-the-scenes behavior of financial institutions is key to success in the market. Concepts such as imbalance, the filling of hidden orders (mitigation), and liquidity manipulation are the foundation of strategies that multiply a trader’s precision in entry and exit.
Among these, one of the relatively advanced yet critical tools for professional analysts is the “Mitigation Block.”
In this article, we will provide a step-by-step tutorial on the exact structure and application of Mitigation Blocks on real charts, clarifying the path to understanding and utilizing them.

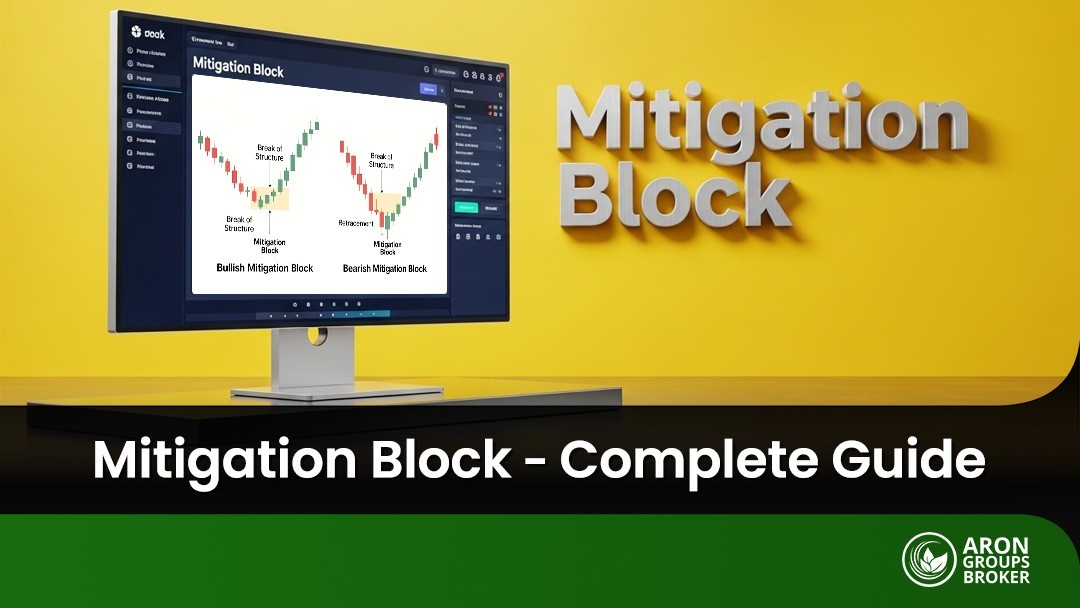
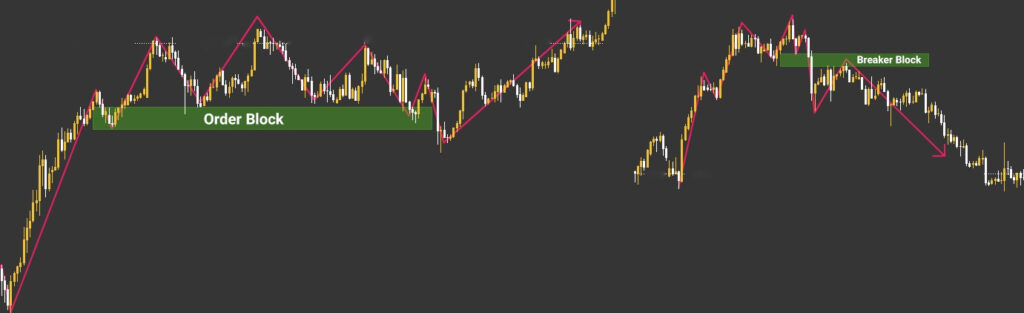
- A Mitigation Block is a type of Order Block that, contrary to expectations, fails to continue the current trend. Instead, it leads to a Market Structure Shift (or Change of Character) and a price reversal.
- Its main difference from a Breaker Block is that a Breaker Block first successfully continues the trend (e.g., makes a new high/low) before the structure breaks and price reverses. A Mitigation Block, however, fails to continue the trend (e.g., fails to make a new high/low) and directly causes a reversal in market direction.
- These zones are typically identified as potential future supply or demand areas and can provide valuable trading opportunities upon a retest.
What is a Mitigation Block?
According to the How To Trade website, in the ICT price action methodology, a Mitigation Block (MB) is a type of Order Block that temporarily causes a price retracement but subsequently fails to continue the current trend. Instead, it leads to a Market Structure Shift (MSS).
Unlike powerful Order Blocks, which are expected to drive trend continuation or break structure, these blocks fail in that duty. Their role shifts to that of a corrective or “mitigating” block, marking a point where institutions likely failed to push price further and are now mitigating their losing positions.
Why are Mitigation Blocks Important in Technical Analysis?
In Smart Money trading styles, Mitigation Blocks are recognized as key inflection points signaling a change in market direction. Correctly identifying them helps a trader better understand price behavior and make more precise decisions, including:
- Early Detection of Reversals: These blocks are typically accompanied by a break in market structure.
- Precise Entry/Exit Tool: Entry or exit signals can be derived when price touches (retests) or rejects these blocks.
- Effective Risk Management: A stop-loss can be strategically placed on the opposite side of the block.
- More Accurate Order Flow Analysis: These blocks often operate in tandem with liquidity events.
How Do Mitigation Blocks Differ from Order Blocks and FVGs?
While all three concepts, Mitigation Blocks, Order Blocks, and FVGs (Fair Value Gaps) are used in Smart Money analysis, their roles in market structure are distinct. Understanding these differences is crucial for a clearer interpretation of price behavior.
Mitigation Block vs. Order Block
A Mitigation Block is a market area where a financial institution or large player, after initiating a sharp move (often creating an imbalance), returns to a previous price point. The purpose of this return is to mitigate either to fill remaining orders or offset losses from a failed position. These blocks are typically identified by candles that previously caused a strong price move but have not yet been fully retested or “filled.”
In contrast, an Order Block (OB) is an area where financial institutions have placed their orders just before the start of a new, significant trend. This block is typically defined as the last bullish candle before a major bearish move or the last bearish candle before a major bullish rally.
An Order Block is typically associated with a Break of Structure (BOS) and signals the initiation of a major new move in the opposite direction of the prior trend. When price retraces to this area for the first time, it presents an opportunity to enter a position aligned with the new trend. These zones are generally intended for initiating fresh positions.

The primary purpose of trading a Mitigation Block is to capitalize on the mitigation of failed or incomplete orders by large players. Conversely, an Order Block is used to enter a new position at the origin of a strong institutional move.
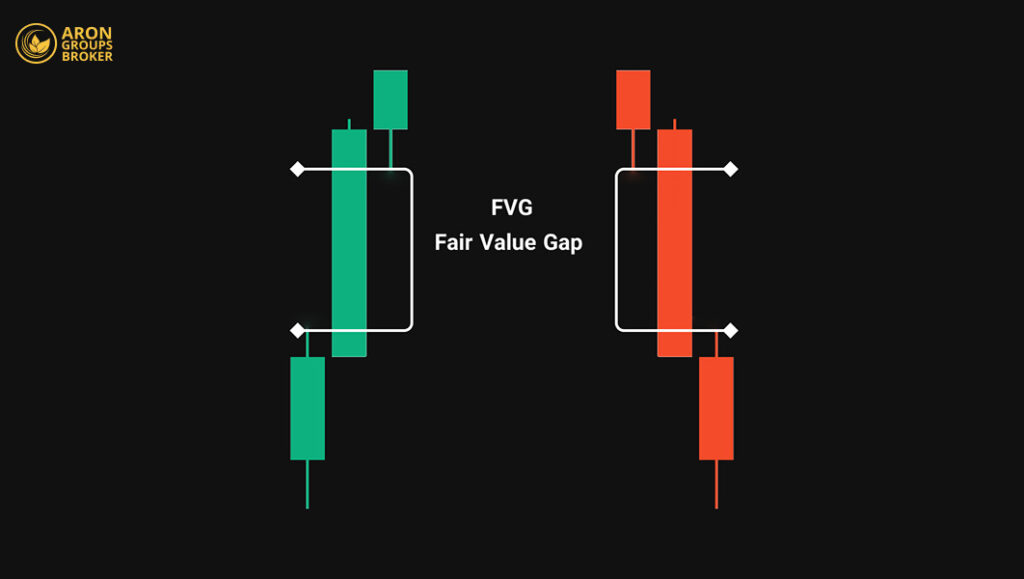
Mitigation Block vs. FVG (Fair Value Gap)
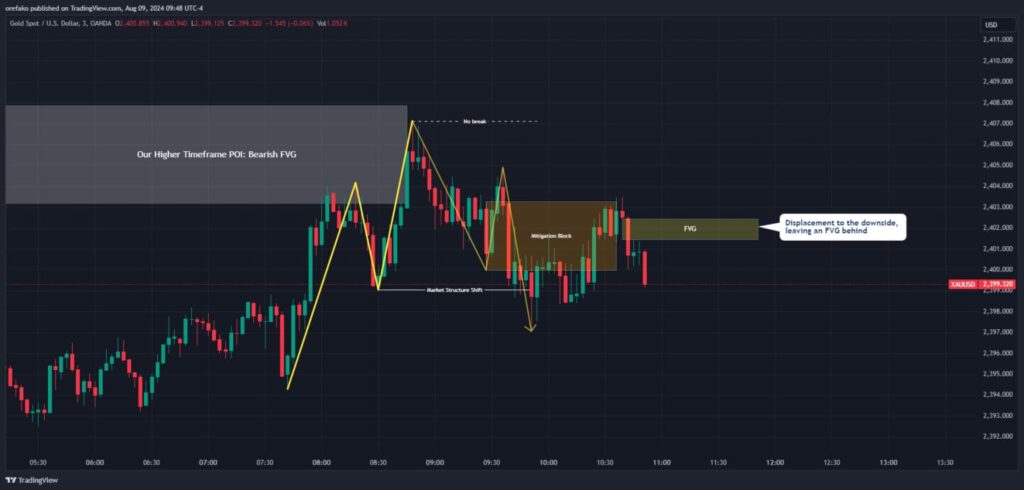
An FVG (Fair Value Gap) is not a block; rather, it is a price gap. It’s an inefficiency (or imbalance) identified by a three-candle pattern where the wicks of the first and third candles do not fully overlap the price range of the middle candle.
This temporary price gap is typically caused by high-velocity price movement and an imbalance between supply and demand. An FVG is not a structural signal on its own, but its confluence (overlap) with a Mitigation Block significantly strengthens the setup’s validity.
To put it simply, an FVG is a technical symptom of imbalance, whereas an Order Block represents the behavioral action (order placement) of Smart Money.
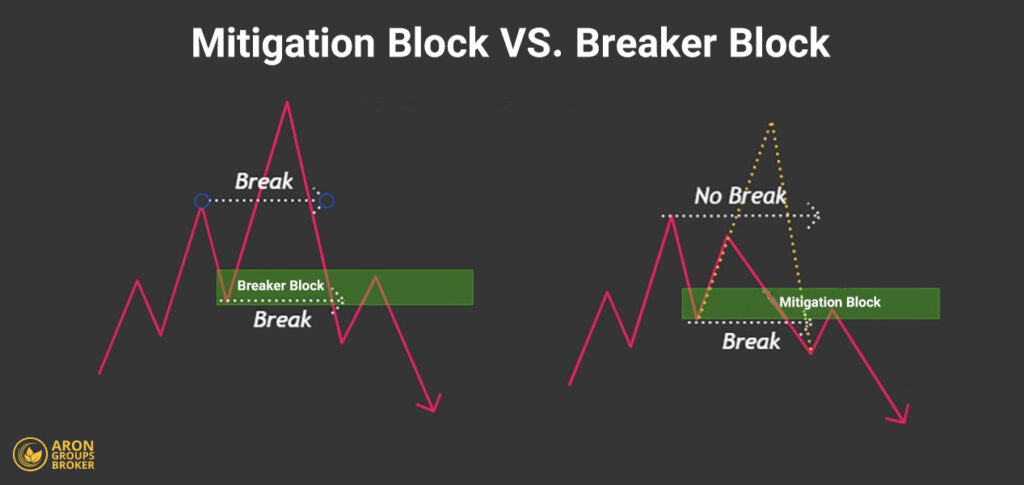
What is the Difference Between a Mitigation Block and a Breaker Block?
At first glance, both Mitigation Blocks and Breaker Blocks (BB) signal a potential trend reversal. Their key difference, however, lies in their interaction with market structure and the sequence of price action:
- Breaker Block: Price first succeeds in continuing the trend (e.g., makes a new high or low, taking liquidity), and then aggressively reverses, breaking structure.
- Mitigation Block: Price fails to continue the trend (e.g., fails to make a new high or low). It reverses before taking the major liquidity, and then breaks the structure.
In short, a Breaker Block first raids liquidity (a “stop hunt”) and then reverses. A Mitigation Block fails to raid liquidity and reverses the trend prematurely.
The Role of Mitigation Blocks in Market Structure Shifts (BOS and CHoCH)
Mitigation Blocks typically appear at points in the chart where the market loses its ability to continue the prior trend. For example, in an uptrend, if the price attempts to move up but fails to create a new high (a failure swing), it signals that buyers are weakening. If the price then reverses and breaks the previous swing low, the market structure has shifted.
In this scenario, the term BOS (Break of Structure) is used to define the break of the low, signifying that the previous trend has terminated and a new trend is potentially forming.
This same event is also frequently called a CHoCH (Change of Character). This specific term is often used to describe the very first indication that the market is shifting its “character” or behavior from bullish to bearish (or vice versa).
In this context, the specific candle or block that initiated this reversal (the failed attempt to move higher) is the Mitigation Block. It provides the first serious signal for the change in market direction and is recognized by professional traders as a key entry point or confirmation of their analysis upon a retest.
According to ICT Traderr, mitigation Blocks don’t just mark the reversal; they highlight the first institutional attempt to reposition orders. When price returns to a Mitigation Block, it often reveals whether large players are defending the new direction, making it a key zone for confirmation rather than prediction.
Types of Mitigation Blocks
Mitigation Blocks are divided into two main categories based on the prevailing market trend: Bullish Mitigation Blocks and Bearish Mitigation Blocks.
Occasionally, in non-trending or range-bound markets, a third type, the Neutral Mitigation Block, can also be observed.
Bullish Mitigation Block
This type of Mitigation Block appears at the end of a downtrend. A bearish Order Block forms, but it fails to create a new low. Instead, price reverses from that area and breaks the previous high (a bullish Break of Structure). This break shifts the market structure to bullish, and the aforementioned block is now identified as a Demand Zone for future entries upon a retest.
Characteristics of a Bullish Mitigation Block:
- Forms at the end of a downtrend as selling pressure fades.
- Involves a bearish Order Block failing to print a new low.
- Price reverses and causes a Break of Structure (BOS) to the upside.
- The market’s character shifts from bearish to bullish (signaling a new trend).
- The block is converted into a Demand Zone, with a high probability of a strong price reaction in the future.
Bearish Mitigation Block
This block forms when the market is at the end of an uptrend. A bullish Order Block forms but fails to make a new high. Price then reverses and breaks the previous low to the downside. In this scenario, the market structure shifts from bullish to bearish, and this block can be considered a Supply Zone.
Characteristics of a Bearish Mitigation Block:
- Forms at the end of an uptrend as buying power diminishes.
- Involves a bullish Order Block failing to print a new high.
- Price reverses and causes a Break of Structure (BOS) to the downside.
- The trend’s direction changes from bullish to bearish (start of a bearish phase).
- The block is converted into a Supply Zone, which can be a key reaction point for price in the future.
Neutral Mitigation Block
In conditions where the market is neither bullish nor bearish (ranging or consolidating), Mitigation Blocks may form that do not cause a clear structural shift but still indicate weakness in momentum. These blocks typically appear at the end of corrective phases or just before the initiation of a powerful move.
Characteristics of a Neutral Mitigation Block:
- Forms in range-bound markets or during corrective phases.
- Does not create a clear Break of Structure (BOS) or reliable Change of Character (CHoCH).
- Represents weakness in the preceding move and signals a potential, but unconfirmed, reversal.
- Acts as a warning sign for a potentially strong move, but is not a definitive signal on its own.
- Requires more precise analysis and additional confluences, such as a confirmation candle, an FVG, or a lower-timeframe reaction.
A Simple Guide to Mitigation Blocks
In this section, we will use a step-by-step, visual approach to learn how to identify Mitigation Blocks and leverage them in your trading.
How to Identify a Mitigation Block on the Chart
Let’s walk through the steps for identifying a Mitigation Block on a chart.
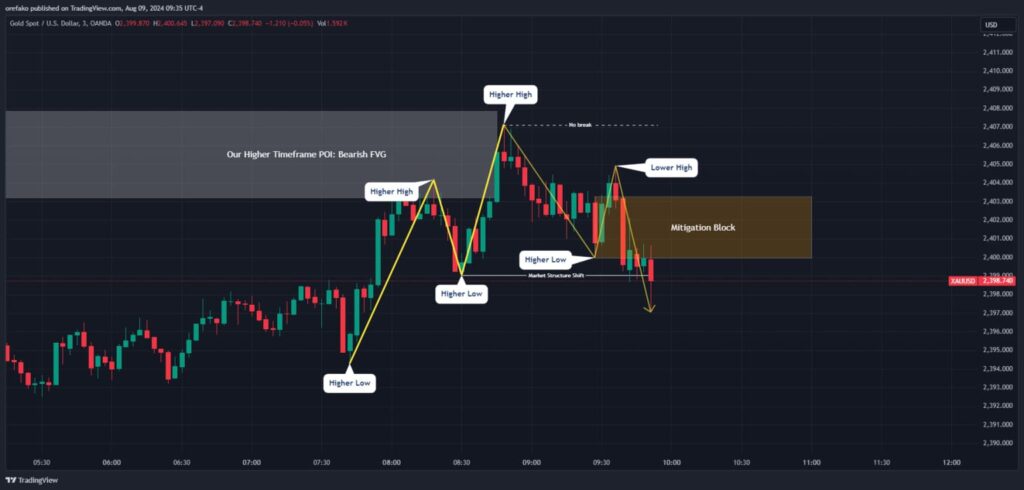
- Identify the Higher Timeframe POI (Point of Interest): The first step is to mark a key HTF zone, such as an Order Block, FVG, or rejection block (e.g., on the 15-minute chart). This area gives context and validity to the analysis.
- Wait for a Price Reaction: Once the price reaches this HTF POI, drop to a lower timeframe (LTF), such as the 3-minute chart, and look for signs of a reversal and a market structure shift.
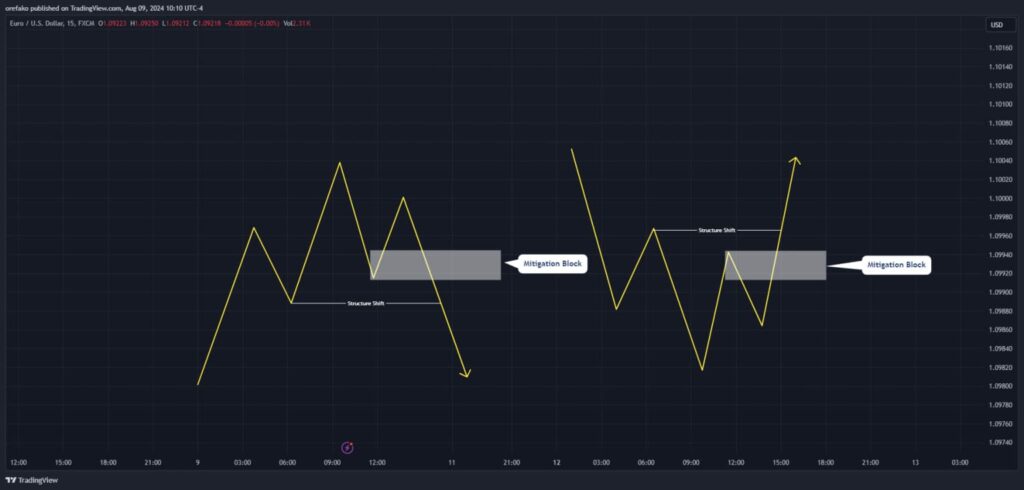
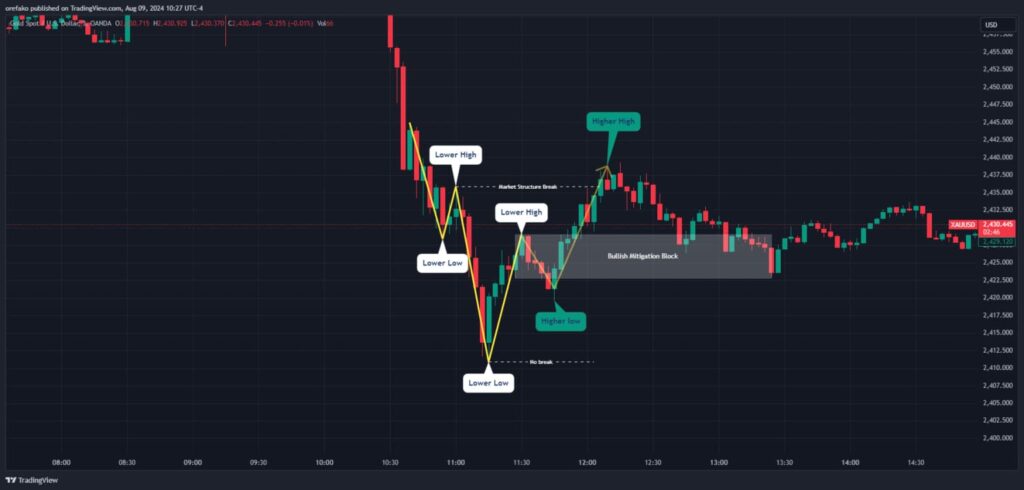
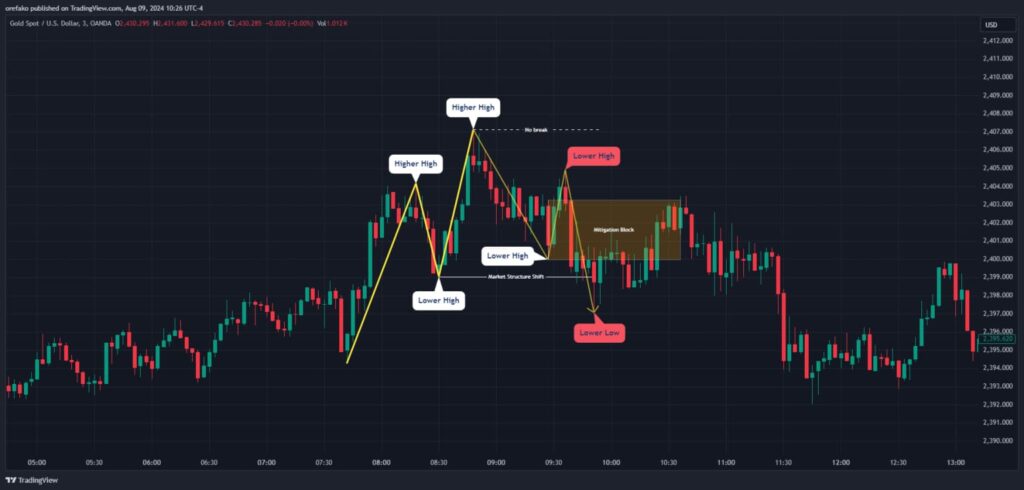
The identification sequence for a Bearish Mitigation Block is as follows:
- Price forms a temporary uptrend (Higher Highs and Higher Lows).
- Price then fails to create a new Higher High (HH), signaling weakness in the bullish momentum.
- The previous Higher Low (HL) is broken, resulting in a Break of Structure (BOS) to the downside.
- The last bullish candle just before this BOS (which often sweeps liquidity) is the Bearish Mitigation Block.
The identification sequence for a Bullish Mitigation Block is as follows:
- Price forms a temporary downtrend (Lower Lows and Lower Highs).
- Price then fails to create a new Lower Low (LL), signaling weakness in bearish momentum.
- The previous Lower High (LH) is broken, resulting in a Break of Structure (BOS) to the upside.
- The last bearish candle just before this bullish BOS is the Bullish Mitigation Block.
Visual Characteristics of Mitigation Blocks Across Timeframes
On higher timeframes (HTF), such as the 1-hour or 4-hour, Mitigation Blocks typically appear as strong, well-defined zones where price has reacted in the past. These zones often feature candles with large, decisive bodies, indicating significant institutional decision-making.
Common Mistakes in Identifying Mitigation Blocks
This section covers errors many traders encounter, especially during the early learning phases:- Confusing Regular Order Blocks with Mitigation Blocks Many traders mistake any block that gets a price reaction for a Mitigation Block. A true Mitigation Block is only formed when price fails to continue its trend and then breaks structure in the opposite direction. In contrast, standard Order Blocks may simply continue the trend without any structural shift. Ignoring this key distinction leads to flawed entries.
- Ignoring the Actual Structure Break (BOS or CHoCH) A Break of Structure (BOS) or Change of Character (CHoCH) is the critical confirmation of a trend change. If a trader only looks at the block itself and assumes it’s a Mitigation Block without verifying that market structure has actually been broken, they may enter a trade where no real reversal has occurred.
- Failing to Check the Higher Timeframe Context Mitigation Blocks hold the most validity when they align with the higher timeframe (HTF) narrative. Otherwise, a block seen on a lower timeframe might just be minor market “noise” with no real institutional power behind it. Not using the HTF as a filter is a common reason for premature and failed entries.
- Entering Without Additional Confirmation (Candlestick or Divergence) Even if a Mitigation Block is identified correctly, entering the trade without observing a valid reversal candle or signs of divergence on indicators (like RSI or MACD) can expose the trader to high risk. Confirmations play a vital role in filtering out weak setups.
Key Points for Practicing Mitigation Blocks on a Demo Account
To properly learn to identify and trade Mitigation Blocks, using a demo account is an invaluable opportunity. By following these tips, you can refine your analysis and strengthen your visual recognition and decision-making skills:- Always Start Your Analysis on the Higher Timeframe (HTF) Before diving into the LTF, first identify a key POI (Point of Interest), like an FVG or Order Block, on a higher timeframe (e.g., 15-minute or 1-hour). This POI acts as your high-probability focal point.
- A Price Reaction Is Not Enough; Wait for the Break of Structure A Mitigation Block is only validated after the market structure breaks. If price simply reacts to a block but fails to break structure, that block likely lacks the power to reverse the trend.
- Use Confirmation Tools for Added Precision To filter out weak signals, use a confluence of tools, such as RSI/MACD divergence, reversal candlestick patterns, and other valid structural patterns. These confirmations help you enter at more opportune moments.
- Train Your “Chart Eye” by Practicing on Various Assets The behavior of Mitigation Blocks can vary slightly across different markets (like forex pairs, gold, or cryptocurrencies). By reviewing and comparing these blocks on multiple charts, you will gradually enhance your visual analysis and diagnostic accuracy.
Trading Strategies Using Mitigation Blocks
In this section, we will review how to enter trades, combine Mitigation Blocks with other technical concepts, and build a complete trading setup.
Entering a Trade Upon a Retest of the Mitigation Block
There are two general approaches for entering a trade using a Mitigation Block:
- The Aggressive Entry: Immediately place a buy or sell limit order directly at the Mitigation Block level as soon as it is identified. This method carries a higher risk but offers a more precise entry point.
- The Conservative Entry: Wait for the price to retest the block and form a confirmation candle within the zone before entering. This method provides greater certainty, although the entry may occur later.
In both scenarios, the stop-loss is typically placed on the far side of the block (just behind it) or beyond the last Swing High/Low. The profit target can be set at the next FVG or Order Block in the direction of the trade.
Combining Mitigation Blocks with Liquidity and S&D Zones
A Mitigation Block gains significantly more validity when it has confluence (aligns) with the following concepts:
- Liquidity: If the block is located near areas of order concentration (such as stop-loss clusters or clear/obvious highs and lows), the probability of a strong reaction increases.
- S&D Zones (Supply and Demand): The confluence of a Mitigation Block with a powerful, pre-existing Supply or Demand zone significantly raises the probability of a price reversal. Such overlaps are ideal for designing high Risk-to-Reward (R:R) trade setups.
Using Confirmations: Confirmation Candles, Indicators, and Lower Timeframes
To reduce risk and increase entry precision, you can use the following confirmations:
- Confirmation Candles: Candlestick patterns like an Engulfing candle, a Pin Bar, or candles with long rejection wicks are strong signs of a reversal.
- Indicators: Tools like the RSI (for divergence), MACD, or OBV can be useful alongside price action to confirm the trend reversal.
- Lower Timeframe (LTF) Entry: If your main analysis is on a higher timeframe (HTF), it is best practice to wait for an entry confirmation on a lower timeframe (e.g., 1-minute or 3-minute). This helps in finding more precise, lower-risk entries.
Trade Setup: Combining Mitigation Blocks, Order Blocks, and FVGs
Here are the steps for an effective setup that combines Mitigation Blocks, Order Blocks, and FVGs:
- Identify the POI (Point of Interest) on the Higher Timeframe (HTF) First, on an HTF chart (e.g., 15-minute or 1-hour), identify a key zone such as an Order Block or FVG. This area is marked as the high-probability location for a price reaction.
- Monitor for Price Entry and a CHoCH (Change of Character) When price enters this HTF POI, drop to a lower timeframe (LTF) and watch for signs of a Change of Character. This event is typically marked by a failure to continue the trend and a subsequent break of the prior structure, signaling a potential market reversal.
- Identify the Mitigation Block Formation on the LTF Following the CHoCH, the price action will often define a Mitigation Block, the specific zone from which the main reversal was initiated. This block becomes the ideal entry point for the new trade.
- Wait for Entry Confirmation (Candle or Divergence) To reduce risk, wait for the price to retest the Mitigation Block and show confirmation, such as a valid reversal candlestick or indicator divergence. These confirmations strengthen the probability of a successful reversal.
- Execute the Trade and Set SL/TP At this stage, you can enter the trade.
- Stop-Loss (SL): Placed just on the other side of the Mitigation Block to protect against the trade failing.
- Take-Profit (TP): Typically set at the next FVG or a significant previous high/low in your favor, ensuring a favorable risk-to-reward ratio.
According to PineScript Market, mitigation Blocks work best when they filter trades, not force them. Instead of treating every block as an entry, use them to narrow the chart down to where you should be watching price behavior closely. This shifts your trading from impulsive to selective, increasing consistency.
Application of Mitigation Blocks in Various Markets
Although the core concept of a Mitigation Block is universal, its manifestation differs across various markets, such as Forex and cryptocurrencies, depending on volatility conditions, price structure, and trader behavior. In this section, we will examine these differences.Mitigation Blocks in the Forex Market
In the Forex market, a Mitigation Block is often observed as a key support or resistance zone where significant price reactions have occurred. When the price retraces to this zone, it is frequently used as an area for a reversal. For example, when price reacts after hitting an important POI (Point of Interest), like an FVG or Order Block, and a reversal structure forms (e.g., a failure to make a new low, followed by a break of structure and the formation of a higher high), that originating area becomes a valid Mitigation Block. This block provides traders with an entry signal in the direction of the new trend, especially if confirmations like a reversal candle or a clear structure break are also observed.Mitigation Blocks in the Cryptocurrency Market
In the cryptocurrency market, the process of identifying and forming Mitigation Blocks is very similar to the Forex market, with one key difference: due to higher volatility, structures are formed and broken at a much faster pace. While this creates more frequent trading opportunities, it also demands a higher degree of analytical precision. A standard setup in the crypto market follows these steps:- Price taps into a significant higher-timeframe POI.
- A Change of Character (CHoCH) occurs, indicating the market is shifting from its previous phase (bullish or bearish) and showing signs of reversal.
- On a lower timeframe, a strong confirmation candle (often a powerful candlestick pattern) forms, providing the entry signal.
- The price target is typically set at the next FVG or a key level, such as a prior support or resistance zone.
Pros and Cons of Using Mitigation Blocks
Like any analytical tool, Mitigation Blocks have their own specific strengths and weaknesses, which we will review below.
Advantages (Pros) of Mitigation Blocks
- Identifying High-Probability Reversal Zones
Mitigation Blocks form in areas where the market previously failed to continue its move. These zones act as a signal of weakness in the prior trend and can be ideal locations for the initiation of a new trend. - More Precise Entry and Exit with Better Risk Management
Because the block provides a well-defined zone, a stop-loss can be set very tightly, often just on the other side of the block. Concurrently, profit targets can be clearly defined at the next FVG or key structural level, which significantly improves the potential Risk-to-Reward ratio of a trade. - Confirming Market Sentiment and Liquidity Concentration
These blocks typically form where significant buy or sell orders were activated. As such, they can indicate the presence of “Smart Money” or institutional players and a shift in liquidity, especially when they have confluence with an FVG or a major Order Block. - A Systematic and Repeatable Tool for Trading Strategies
When combined with concepts like CHoCH, BOS, FVGs, and Order Blocks, Mitigation Blocks can become part of a systematic, repeatable analytical strategy that is applicable across all timeframes.
Disadvantages (Cons) of Mitigation Blocks
- Potential for False Signals in Ranging Markets
In conditions where the market lacks a clear directional trend (i.e., is range-bound), Mitigation Blocks may appear without valid structural backing. This can lead to premature or incorrect trade entries. - Requires Multi-Timeframe Analysis and Strong Confirmation
To ensure the validity of a Mitigation Block, it is essential to analyze the higher timeframes (HTF) and confirm a true break of structure. Without this layered analysis, the probability of a misinterpretation increases. - Subjectivity in Defining the Block’s Precise Zone
In some cases, determining the exact border of the block (e.g., how much of the wick to include versus the body) can be subjective and may vary between traders, leading to different zone drawings. - Vulnerability to Market Manipulation (Liquidity Traps)
Some large institutions may intentionally create price action that looks like a Mitigation Block to induce or “trap” retail liquidity. Therefore, relying solely on a Mitigation Block without considering the overarching market structure and other confluences can be risky.
Conclusion
Although a Mitigation Block may appear at first glance to be just a simple reversal zone, it is, in fact, a reflection of the market’s hidden decisions and the reaction of major players to liquidity imbalances. Understanding these blocks is not just about finding an entry point; it is a bridge between price behavior and market psychology.
A trader who can interpret a Mitigation Block not merely as a pattern, but as a signal of a “shift in collective sentiment,” will be one step ahead of the crowd. This concept is more behavioral than it is technical, and mastering it demands a structural perspective, consistent practice, and analytical patience.
FAQ
1. What are the limitations of Mitigation Blocks, and how can we avoid false signals?
These blocks perform best in trending markets and may provide false signals in range-bound conditions. Furthermore, drawing them can sometimes be subjective (e.g., how do you define the border? The candle body or the wick?). To reduce risk, it is recommended to use confluences such as an overlapping FVG, indicator divergence, or reversal candles. Prioritize blocks that are accompanied by a confirmed Market Structure Shift (CHoCH or BOS).
2. Can you trade relying solely on Mitigation Blocks?
No. A Mitigation Block should not be the sole basis for a trading decision. To increase trade accuracy, it is essential to combine it with other confirmations. Without these complementary factors, there is a significant risk of a flawed entry or a false signal.
3. What is the best timeframe for identifying Mitigation Blocks?
The best method is multi-timeframe analysis. Typically, you identify a key Point of Interest on a higher timeframe (like the 15-minute or 1-hour), then drop down to a lower timeframe (like the 2- or 3-minute) to look for the Mitigation Block formation and other signs of reversal.
4. Are Mitigation Blocks usable in all markets (Forex, Crypto, Gold)?
Yes, but their behavior varies by market. In the cryptocurrency market, blocks form more rapidly due to higher volatility. They are also effective in Forex and Gold, but you must pay attention to the specific asset’s characteristics, liquidity levels, and the behavior of its buyers and sellers.
5. How do Mitigation Blocks help with risk management?
Given the well-defined boundaries of these blocks, a stop-loss can be placed precisely just behind them. Additionally, this makes it easier and more logical to set profit targets at subsequent zones, such as the next FVG or a major Swing High/Low, which in turn improves the trade’s overall Risk-to-Reward ratio.