


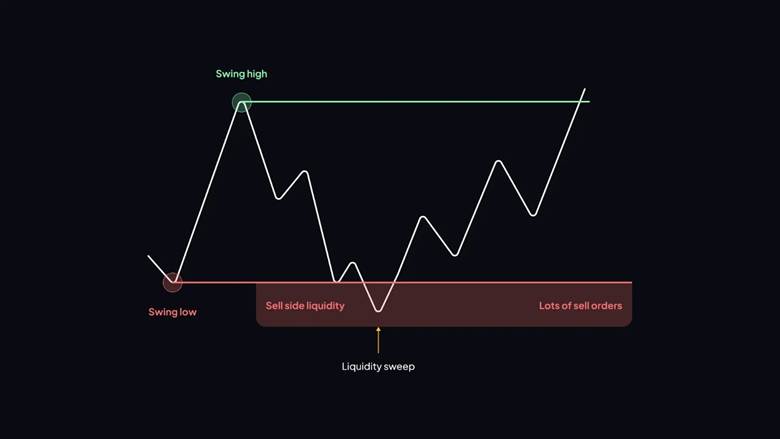
Understanding buy side and sell side liquidity reveals why price often sweeps highs or lows before strong moves.
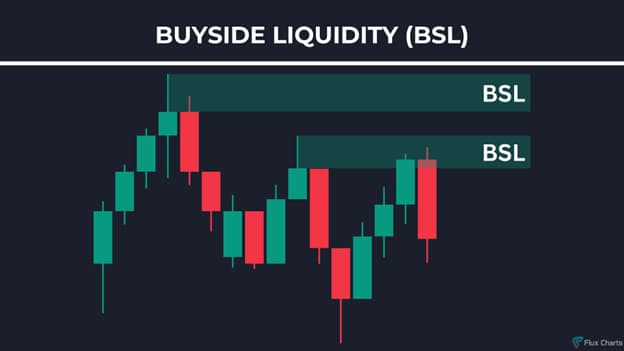
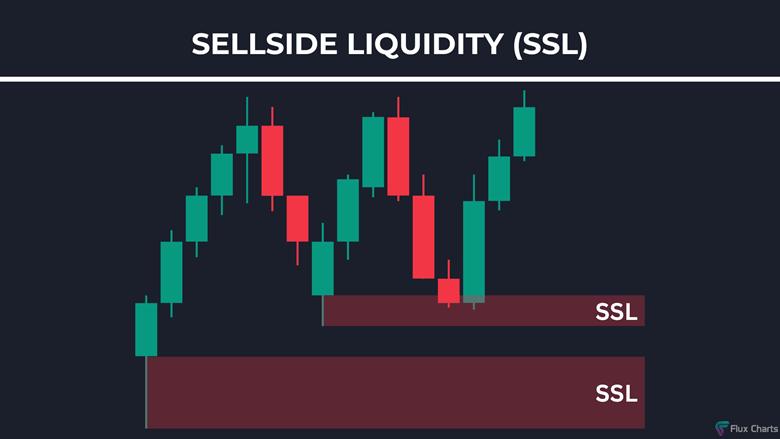
Buy-side liquidity often forms above recent highs, where stop-loss orders from short positions tend to cluster, while sell-side liquidity commonly develops below recent lows, driven by stop placements from long positions.
However, these areas do not consist solely of retail stop losses; they may also include institutional order flow, such as hedging activity, passive limit orders, and algorithmic execution interest.
Such liquidity pools and zones attract participation because they offer the depth required for larger transactions to be executed with greater efficiency. Traders who understand how liquidity concentrates around these areas can gain deeper insight into market flow, execution dynamics, and potential price reactions
Stay with us until the end to discover clear ways to spot and use buy side liquidity and sell side liquidity in your daily trading.

- Buy-side liquidity forms above swing highs from short sellers' stop losses
- Sell-side liquidity clusters below swing lows from long positions' stops.
- Price sweeps liquidity to trigger orders, enabling efficient institutional entries.
- Sweeps often precede reversals or continuations, revealing market structure shifts.
What Buy Side and Sell Side Liquidity Really Means
In financial markets, buy side and sell side liquidity describe clusters of resting orders that influence price movement. These areas often hold stop-loss orders or pending trades. Traders watch them closely because price tends to move towards these zones before major shifts.

Key Point:
Sell side liquidity often forms below equal lows; buy side above equal highs.
Here is a clear comparison:
| Aspect | Buy Side Liquidity | Sell Side Liquidity |
|---|---|---|
| Location | Above swing highs or resistance levels | Below swing lows or support levels |
| Typical Orders | Buy stop orders (stop losses of short positions) | Sell stop orders (stop losses of long positions) |
| What Triggers It | Price sweeping highs to activate buys | Price sweeping lows to activate sells |
According to Flux Charts, buyside liquidity marks levels where short sellers place stop losses, while sellside liquidity captures long positions’ stops.
Buy Side Liquidity in Market Structure Definition
Buy side liquidity forms above recent swing highs. Traders who sold short place buy stop orders there to limit losses. These resting liquidity areas create clusters of potential buy orders.
In the smart money concept, institutions may push prices upwards to trigger these stops. This action provides the volume needed for large positions. Stop loss liquidity here acts as fuel for upward sweeps.
Sell Side Liquidity: Meaning and Order Clusters
Sell side liquidity meaning, refers to order clusters below swing lows. Long-position traders set sell stop orders in these zones. Pending sell orders accumulate, forming resting liquidity pools.
Price often dips to these levels to clear stops from previous buyers. According to XS.com, sell-side liquidity gathers where sell stops cluster at support.
Key Differences of Buy Side Liquidity and Sell Side Liquidity
- Location: Buy side sits above highs; sell side below lows.
- Order Type: Buy side involves buy stops; sell side involves sell stops.
- Market Impact: Sweeping buy side may signal reversals or continuations upwards; sell side sweeps often precede moves.
- Trader Exposure: Buy side targets short sellers; sell side targets long buyers.
These differences help traders read market intentions. Understanding buy side and sell side liquidity reveals why price targets specific levels before directional changes.
Note:
Liquidity zones are not fixed. They shift with new highs and lows as the market evolves.
Q: Why do these liquidity areas matter for beginners?
A: They explain sudden price spikes or drops. Recognising them helps avoid placing stops in obvious zones that institutions target.
How Liquidity Forms in the Market
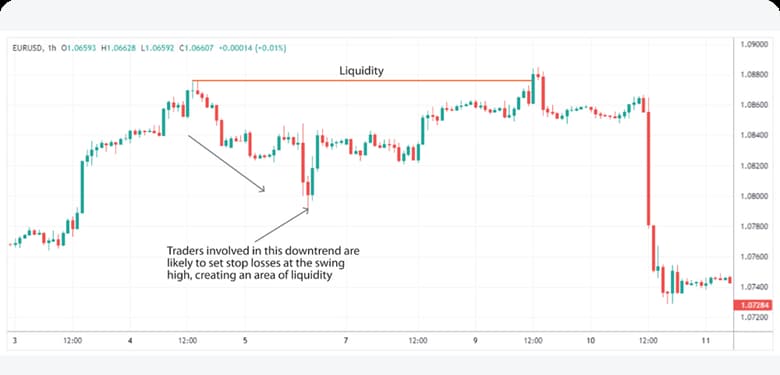
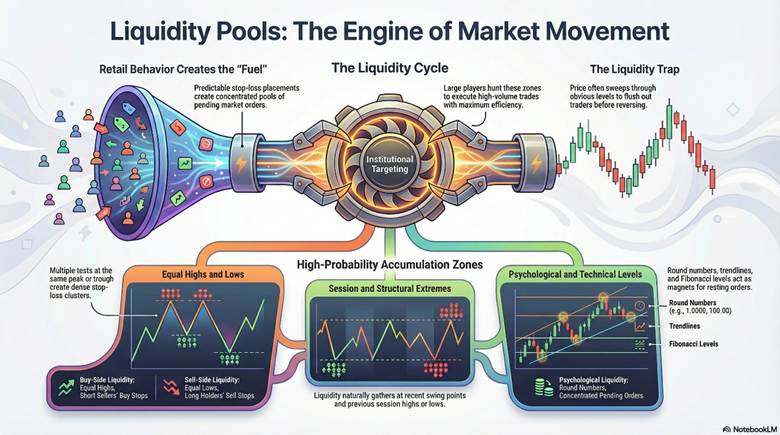
Liquidity develops when orders cluster at specific price levels. Retail traders often place predictable stops, creating liquidity pools. Institutions target these areas to execute large trades efficiently.
equal highs indicate buy-side pools from short stops, while equal lows signal sell-side pools from long stops.
Tip:
Watch for clusters at obvious levels. Institutions often sweep them before the real move begins.
Where Liquidity Naturally Accumulates (Highs, Lows, Key Levels)
Liquidity naturally accumulates where traders expect the price to reverse or continue. These spots include recent extremes and technical levels.
Retail behaviour drives much of this buildup. Traders place stops just beyond swing points.
Here are common accumulation points:
- Recent swing highs and lows.
- Equal highs (multiple tests at the same peak).
- Equal lows (multiple tests at the same trough).
- Previous session or week highs/lows.
- Round psychological numbers.
- Trendlines and Fibonacci retracement levels.
According to FXOpen, these areas hold concentrated stop-loss orders that institutions target.
Tip:
Mark equal highs and equal lows first. They often reveal where liquidity pools may sit before the session starts.
Resting Liquidity and Pending Order Concentration
Resting liquidity refers to pending orders waiting away from the current price. These include buy stops above highs and sell stops below lows.
Traders set them to protect positions automatically. Short sellers place buy stops above resistance. Long holders set sell stops below support. Concentration grows as more traders use the same levels.
This creates visible resting liquidity pools. Price often moves towards them to clear orders.
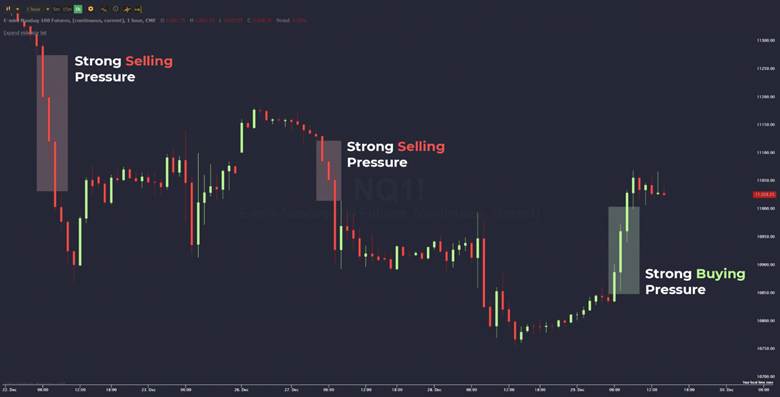
Stop Loss Liquidity: The Hidden Fuel Behind Price Moves
Liquidity generated by triggered stop-loss orders can amplify sharp price movements, as these orders convert into market orders the moment they are activated. This process releases the order flow required for the execution of large positions.
However, price movement towards such areas is not necessarily the result of deliberate market steering; rather, it reflects the natural interaction of supply, demand, and order flow within the market.
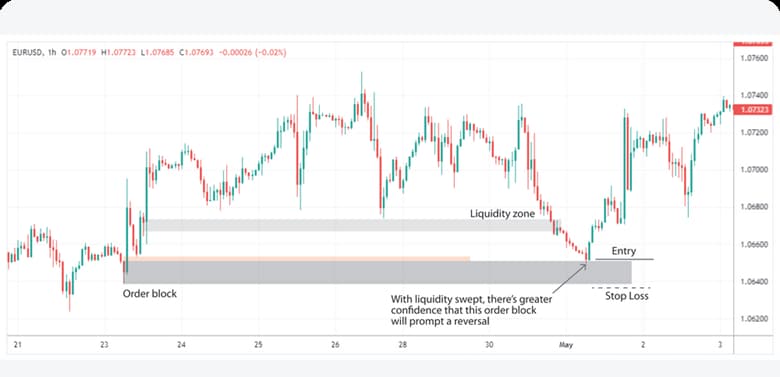
Price may chase obvious levels, only to reverse in a liquidity trap. Such traps flush weak hands through false breakouts.
Liquidity Zones, Pools, and Order Flow Dynamics
Liquidity zones and pools play a key role in order flow dynamics. They show where orders cluster and influence price direction. Traders track them to anticipate moves driven by large players.
Key Insight:
Liquidity zones act like magnets; price is drawn to clear them before directional moves.
What Are Liquidity Zones and Why Traders Track Them
Liquidity zones are broader price areas with expected order concentration. They form around swing highs, lows, or equal levels.
Traders track these zones because the price often moves towards them. Clearing liquidity provides efficiency for institutional trades. Liquidity zones offer context for broader market trends and potential reversal points.
Understanding Liquidity Pools in Trading
Liquidity pools represent specific clusters of orders within zones. These include tight groups of stop losses or pending entries.
Pools act as targets for price sweeps. Once cleared, they reduce resistance to continuation. In order to flow, pools reveal where volume hides. According to ACY Securities, pools often trigger large volumes around previous extremes.
Visible vs Hidden Liquidity in Order Flow
Visible liquidity shows in the order book as limit orders. Traders see bids and asks at current levels.
Hidden liquidity involves stop orders not displayed until activation. These clusters drive sudden moves when swept.
Order flow dynamics shift when hidden pools activate. Sweeps often leave imbalances, such as a FVG. This gap creates low-resistance paths that the price may revisit.
Key Insight:
Liquidity zones act like magnets; price is drawn to clear them before directional moves.
Q: How do Fair Value Gaps relate to liquidity sweeps?
A: Sweeps grab liquidity quickly, creating imbalances known as FVGs. These gaps act as low-resistance areas. Price often returns to fill them, offering continuation or reversal opportunities.
Smart Money and Institutional Liquidity Behaviour
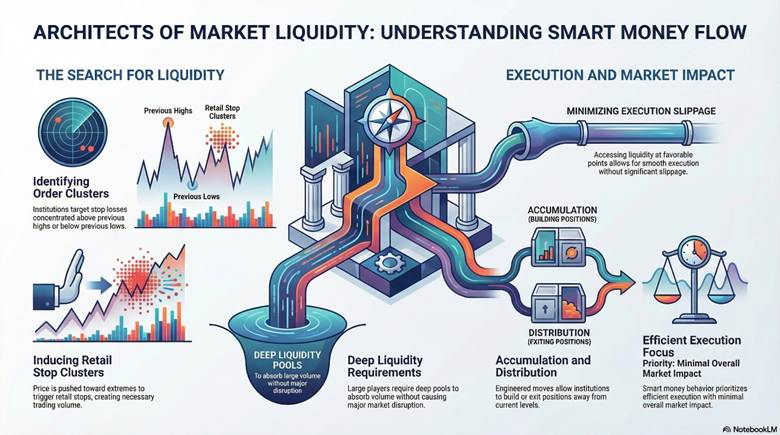
Smart money refers to large institutions like banks and hedge funds. They manage vast capital and influence market direction. Their behaviour around institutional liquidity focuses on efficient execution with minimal impact.
Large players need deep, smart money liquidity to place substantial orders. Without it, their trades cause unwanted price shifts.
Institutions often move prices towards retail stop clusters. This induces stops and creates volume for better entries. In the smart money concept, price sweeps extremes to access this liquidity.
Smart Money Liquidity Explained in Practical Terms
Smart money liquidity consists of order clusters that institutions target. These include stop losses above highs or below lows.
Institutions push prices to these areas deliberately. Triggered stops provide the flow needed for large buys or sells.
This behaviour improves average entry prices. It allows accumulation or distribution away from current levels.
How Institutional Liquidity Drives Execution
Institutional liquidity drives how big orders fill smoothly. Deep pools absorb volume without major disruption.
Institutions engineer moves to resting orders. This grants access to liquidity at favourable points. According to Altrady, smart money seeks liquidity to execute without significant slippage.
Note:
Institutional behaviour reflects execution needs, not personal targeting. Markets reward efficiency.
Liquidity Sweeps and Market Mechanics
Liquidity sweeps drive many sharp price moves in trading. They target clusters of orders tied to buy side and sell side liquidity. These mechanics help large players fill positions efficiently.
Did You Know: A single sweep can clear weeks of accumulated stop loss liquidity in seconds.
What Is a Liquidity Sweep?
A liquidity sweep occurs when the price briefly breaks beyond a key level. It triggers stop losses and pending orders clustered there.
This move collects liquidity quickly. Price often reverses or continues strongly afterwards.
According to Alchemy Markets, sweeps create false breaks that trap traders before the real direction emerges.
Buy Side Liquidity Sweeps vs Sell Side Liquidity Sweeps
Buy side liquidity sweeps target areas above recent highs. Price spikes upward to trigger buy stops from short positions.
This often forms bull traps. Breakout buyers chase the move, inducing fomo in trading. Sell side liquidity sweeps hit below lows. Price dips to activate sell stops from long positions. This creates bear traps.
The sweep clears opposing orders for smoother execution. Buy side sweeps frequently lead to downward reversals after triggering shorts’ stops.

Warning:
Do not assume every sweep is manipulation. Treat it as evidence of where orders were clustered.
How Sweeps Precede Reversals or Continuations
Sweeps often act as stop hunts before reversals. Clearing one side’s liquidity removes resistance for the opposite move.
In other cases, sweeps support continuations. They eliminate counter-trend stops during genuine breakouts.
Common sweep patterns include:
- Long upper wick above a high, followed by a drop (buy side reversal).
- Long lower wick below a low, followed by a rally (sell side reversal).
- Brief close beyond a level, then a quick rejection candle.
- Volume spike on the sweep, then expansion in the new direction.
According to NordFX, sweeps can signal reversal through rapid recovery or continuation via sustained momentum post-clearing.
How Price Interacts With Buy Side and Sell Side Liquidity
Price frequently moves towards clusters of buy side and sell side liquidity. These areas hold stop loss liquidity that institutions target for efficient execution. Once cleared, interaction often signals shifts in direction or momentum.
Trading involves significant risk of loss. Prices can move against positions quickly. Always consider your financial situation and use appropriate risk controls.
Price seeks liquidity at extremes where stops reside, often reversing after grabbing it.
Why Price Moves Towards Liquidity
Price moves towards liquidity because it provides order flow for large trades. In an uptrend, it targets sell-side areas below lows to trigger long stops.
This clears opposition and fuels upward continuation. Downtrends draw price to buy-side zones above highs.
Liquidity zones attract prices like magnets. Stop loss liquidity there turns into market orders when hit.
Liquidity as Dynamic Support and Resistance
Liquidity zones serve as dynamic support or resistance until swept. Before clearing, they temporarily reduce the price.
After a sweep, the zone often flips roles. A former sell-side area below lows becomes new support on retest.
This dynamic nature helps in a support and resistance trading strategy. Cleared liquidity reduces resistance, allowing smoother moves.
Reading Market Structure Through Liquidity
Reading market structure involves watching how the price handles liquidity zones. A quick grab and reversal indicates stop hunt.
Strong follow-through after grab signals a genuine shift. Repeated tests without clearing suggest a range.
Liquidity interactions reveal intentions. Swept zones leave imbalances that price may fill later.
Tip:
Mark recent extremes as potential liquidity zones. Watch for rejection or breakout to gauge structure strength.
Q: Why does price often reverse after reaching a liquidity zone?
A: Price reaches zones to trigger stop loss liquidity, providing volume for institutions. Once cleared, opposition reduces, enabling reversal in the intended direction. This creates efficient entries for large players.
Practical Trading Applications of Liquidity Concepts
Traders apply buy side liquidity and sell side liquidity concepts to make informed real-time decisions. These include spotting liquidity pools, timing entries and exits after sweeps, and managing risk around key zones.
Liquidity zones provide context for potential reactions but require confirmation for reliable trades.
How to Track Buy Side and Sell Side Liquidity in Real Time
Tracking liquidity in real time involves marking potential clusters on charts. Focus on areas where orders likely accumulate.
Follow these steps:
- Identify recent swing highs for buy side liquidity and lows for sell side.
- Mark equal highs (multiple touches at the same peak) and equal lows.
- Highlight previous session, day, or week extremes.
- Note psychological round numbers and old highs/lows from higher timeframes.
- Watch for order flow changes, such as volume spikes near these levels.
These markers reveal potential liquidity pools that the price may target.
Using Liquidity to Time Entries and Exits
Time entries after a sweep clear liquidity and show reversal or continuation signs. For reversals, enter on rejection back into the range.
Buy after the sell-side sweep and bullish confirmation. Sell after buy-side sweep and bearish signals.
Exit positions near opposite liquidity pools or when the price approaches new zones.
According to the International Trading Institute, precise entries often follow sweep confirmation to align with institutional flow.
Risk Management Around Liquidity Zones
Risk management proves essential around liquidity zones due to potential sharp moves. Avoid tight stops in obvious pools to prevent sweeps.
Use position sizing based on distance to zones. Set stops beyond swept levels for better protection.
Trail stops as price clears zones favourably. Effective risk strategies include wider buffers and reduced exposure near high-volatility liquidity areas.
Trading CFDs involves the risk of loss of capital. Consider whether you understand how CFDs work and if you can afford to take the risk.
Common Misconceptions About Market Liquidity
Traders often misunderstand market liquidity concepts. These errors arise from confusing terminology, emotional reactions, and oversimplifications. Clearing them helps build a realistic view of smart money liquidity and price behaviour.
Key Point:
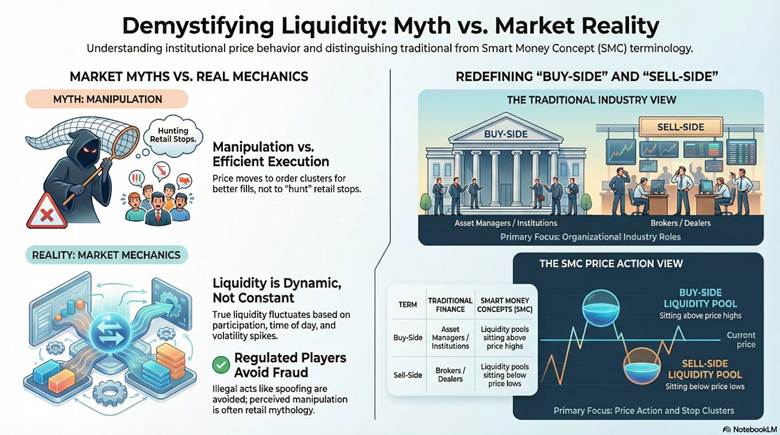
Liquidity engineering reflects institutional efficiency needs. It differs from illegal manipulation, which involves deceptive practices.
Buy Side vs Sell Side Liquidity Misunderstandings
Many confuse Smart Money Concepts (SMC) terminology with traditional finance. In classic terms, buy-side refers to asset managers and institutions buying securities. Sell-side includes brokers and banks providing research and execution.
In SMC, the terms describe order clusters. Buy-side liquidity sits above highs; sell-side below lows. Traditional roles focus on market participants, while SMC emphasises liquidity pools. This mix-up leads to incorrect strategy application.
Is Smart Money Manipulating the Market?
Claims of manipulation often follow liquidity sweeps. Institutions do induce stops to access smart money liquidity.
This creates volume for large orders at better prices. It represents a standard execution strategy, not illegality.
Illegal manipulation involves spoofing or false orders. Liquidity grabs align with efficient market mechanics.
These moves shake out weak positions strategically, allowing institutions to accumulate advantageously.
Strong trading psychology helps traders view them objectively rather than as personal attacks.
The Myth of Ever-Present Liquidity
Some believe liquidity remains constant across all conditions. In reality, it varies by time, asset, and events.
Major news or holidays thin liquidity, causing wider spreads and volatile moves. Forex offers high overall liquidity, but specific pairs or sessions show gaps.
Low liquidity periods can create opportunities but increase risks like slippage. Assuming constant depth leads to poor risk planning.
Conclusion
Understanding buy side and sell side liquidity empowers traders to read market flow rather than chase patterns. This clarity reveals institutional intentions, fostering confident decisions in volatile conditions.
Combine liquidity insights with disciplined risk management, a robust forex trading plan, and precise tools like a position size calculator. Strengthen trading psychology to navigate sweeps patiently and refine skills through a forex demo account.