


Consequent Encroachment (CE) is one of the most useful and most misused ideas in ICT-style trading. Many traders mark the midpoint of a Fair Value Gap (FVG) and assume the price must react there. That is where the problem starts.
CE is not a magic support or resistance line. It is a pricing reference inside an imbalance, and it only becomes meaningful when the surrounding structure, displacement, and liquidity narrative support the setup.
This guide explains how to trade CE as a precision tool for FVG entries, with a practical focus on execution logic, validation rules, and risk control in Forex conditions.

- CE is the balance point of an FVG, usually the 50% level of the gap range.
- CE works best when the FVG is created by clear displacement and structural intent.
- Retracement entries and confirmation entries at CE are different models, with different trade-offs.
- “Tap-and-go” and “deep fill” reactions require different stop and management logic.
- Acceptance beyond the gap is a practical invalidation signal, not a subjective feeling.
- Spread widening, slippage, news volatility, leverage, and regime shifts can distort technically clean setups.
What Is Consequent Encroachment in ICT Trading?
Consequent Encroachment (CE) is the midpoint of a Fair Value Gap. In ICT terminology, traders use it as a reference point for equilibrium within an imbalance that forms during a strong directional move.
The core idea is simple: if the price moves too aggressively and leaves an inefficient delivery, it may partially rebalance into the gap before continuing.
Risk Warning
- Forex and CFD trading involves leverage and can lead to rapid losses.
- Execution can worsen because of spread widening, slippage, session transitions, and news volatility.
- Market regimes change, and past behaviour around CE does not guarantee future reactions.
- This article is educational content only, not financial advice.
Consequent Encroachment Definition and Core Concept
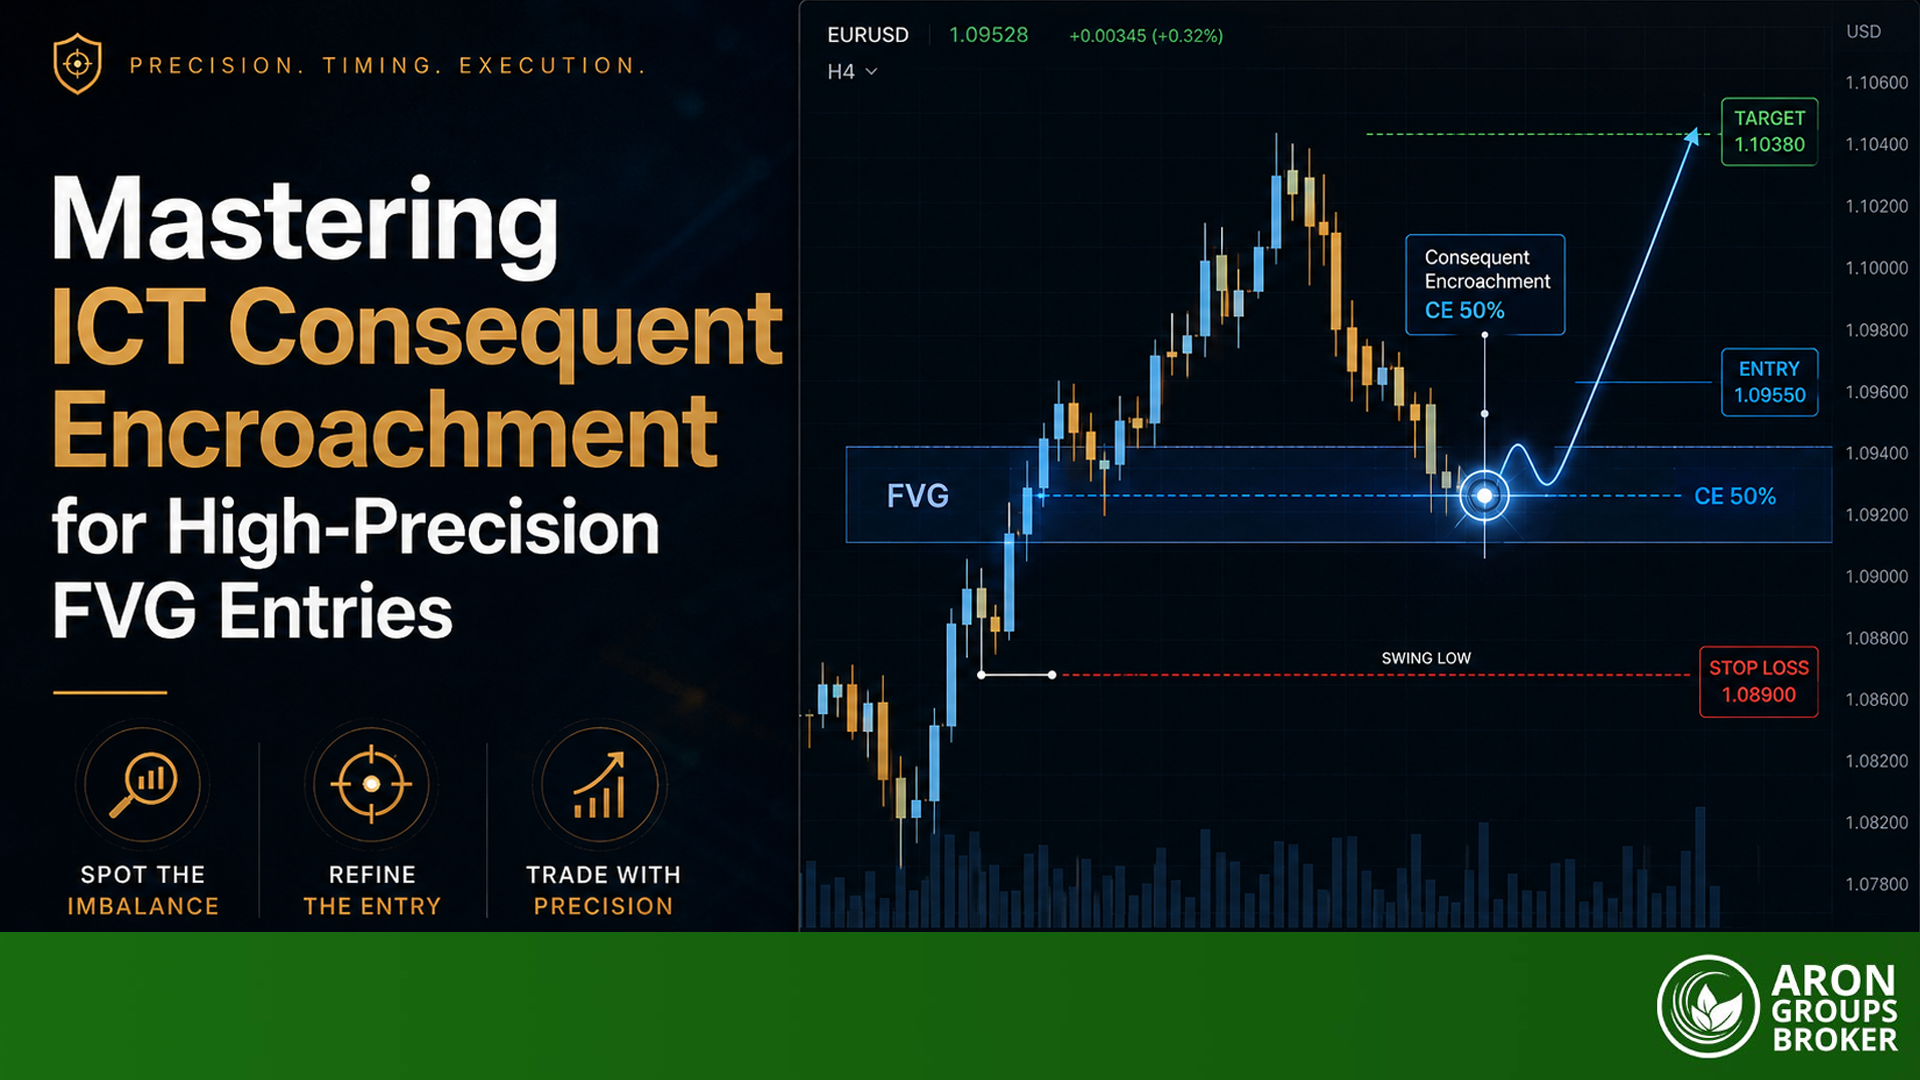
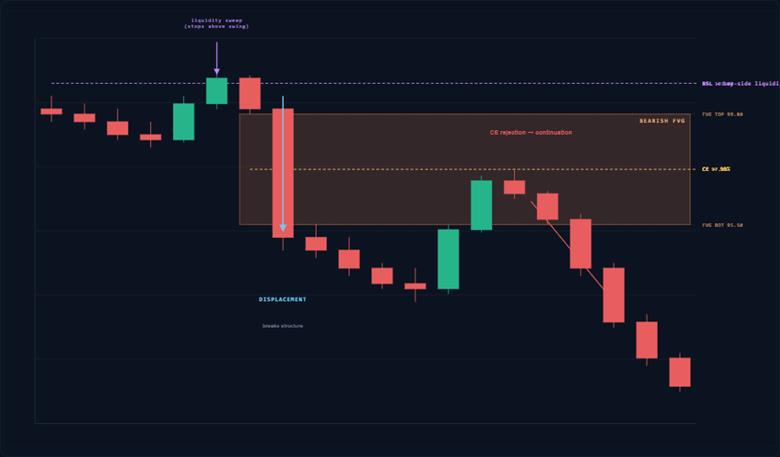
A Fair Value Gap (FVG) forms when price displaces strongly and leaves an imbalance in a three-candle sequence. In a bullish example, the market moves up fast enough that the low of the third candle remains above the high of the first candle. That untraded area is the FVG.
Consequent Encroachment is the midpoint of that imbalance range. Traders mark it because it often acts as a useful re-entry location if the directional move remains valid.
This matters because CE improves entry efficiency. Instead of chasing price after displacement, traders wait for a partial rebalance into the gap.

Did You Know?
CE is best treated as a “decision zone” inside an imbalance, not as proof that continuation will happen.
CE as the Balance Point Within a Fair Value Gap
The reason CE is often set at 50% is that traders view it as the equilibrium point between the upper and lower boundaries of the FVG. It is the market’s “halfway fill” point of inefficiency.
That does not mean all FVGs must respect CE. Some strong trends react before CE. Some weak moves fill through the entire gap. The level is useful because it gives structure to execution, not because it predicts the future.
Fair Value Gap Structure and CE Level Context
CE only makes sense when the FVG itself is valid. If the imbalance is poor quality, the midpoint is just a line on the chart.
FVG Formation and Displacement Validity
The best CE setups come from FVGs created by genuine displacement. In practice, valid displacement usually shows:
- Strong candle bodies relative to recent bars
- Clean directional intent with limited overlap
- A visible break of structure or shift in delivery
- Efficient follow-through after the impulse
If price action is choppy, overlapping, and indecisive, the FVG may exist visually, but it often lacks the kind of order flow pressure that makes CE meaningful.
Rule: Prioritise CE setups only when the FVG is created by clear displacement and a structural break.
Why it matters is because CE mainly inherits its quality from the move that created the imbalance.
Midpoint of FVG Trading and Imbalance Equilibrium
Traders often call CE the equilibrium of the imbalance, but that should be understood as a practical trading concept, not a universal law.
In strong directional conditions, the price may only trade into CE and continue. In weaker conditions, the price may fully rebalance the gap and still continue later. The midpoint helps you organise execution decisions:
- Entry location
- Risk placement logic
- Confirmation expectations
- Invalidation thresholds
If you treat CE as an equilibrium inside a broader narrative, it becomes useful. If you treat it as a guaranteed turning point, it becomes dangerous.
CE Entry Models and Precision Execution
Two traders can mark the same CE and take completely different trades. The difference is not the line. The difference lies in how they take the trade.
Retracement vs Confirmation Entries at CE
Retracement entry at CE means you place a limit order at or near the midpoint and expect the level to hold.
This approach gives a better price, a better potential risk-reward ratio, & Earlier participation, But it also carries more risk because you are entering before proof of reaction.
A confirmation entry at CE means you wait for the price to reach the midpoint, then require lower-timeframe evidence that the market is rejecting that area.
Common trigger conditions include:
- Lower timeframe MSS (Market Structure Shift)
- Break of a minor swing in the intended direction
- A small displacement candle away from CE
- A micro FVG is forming in the direction of your bias
Key Takeaways:
- Retracement entry gives better price, but less confirmation.
- Confirmation entry gives better validation, but worse price.
- Your choice should match the quality of the higher timeframe bias and your risk tolerance.
Lower Timeframe Execution Using the CE Level
An example of Bullish EUR/USD CE Execution (text-only scenario)
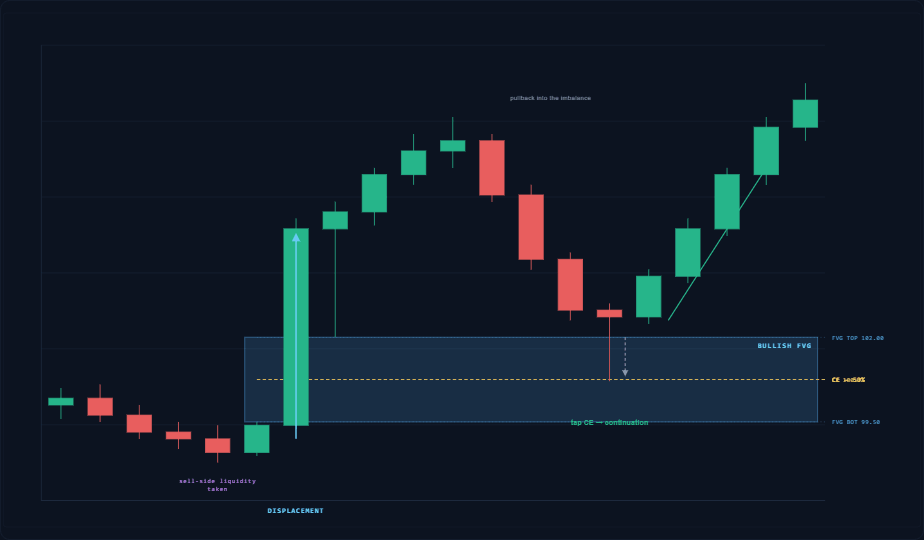
Imagine H1 price sweeps sell-side liquidity below a prior swing low during the London open, then rallies aggressively and breaks a recent H1 swing high. That rally leaves a bullish FVG.
You mark the FVG and its CE.
Price retraces to the midpoint during the next pullback. Instead of buying blindly, you drop to M5:
- Price taps slightly through CE.
- A quick sell-off forms equal lows under the reaction area.
- Those lows are swept.
- The price is rising and breaking an M5 swing high.
- A small bullish micro FVG forms.
- You enter on retracement into the micro FVG.
Stop-loss placing logic:
- Aggressive stop: below the sweep low that formed on M5
- Conservative stop: below the H1 FVG boundary / reaction structure
Target logic:
- Partial at internal liquidity (near M15 equal highs)
- Main target at prior H1 high or buy-side liquidity objective
This is CE used correctly. It gives location, while lower-timeframe price action provides permission.

Reaction Types at Consequent Encroachment
Price does not react the same way at every CE. Reading reaction type helps you avoid poor assumptions.
Tap-and-Go vs Deep Fill Through CE
A tap-and-go reaction occurs when the price touches CE or trades slightly through it, then quickly resumes in the original direction. This often occurs when momentum remains strong and participation is active.
A deep fill happens when price pushes through CE and trades deeper into the FVG before deciding what to do next. This is more common when:
- The impulse was weaker
- The market is transitioning between sessions
- Volatility is mixed
- Opposing liquidity is nearby
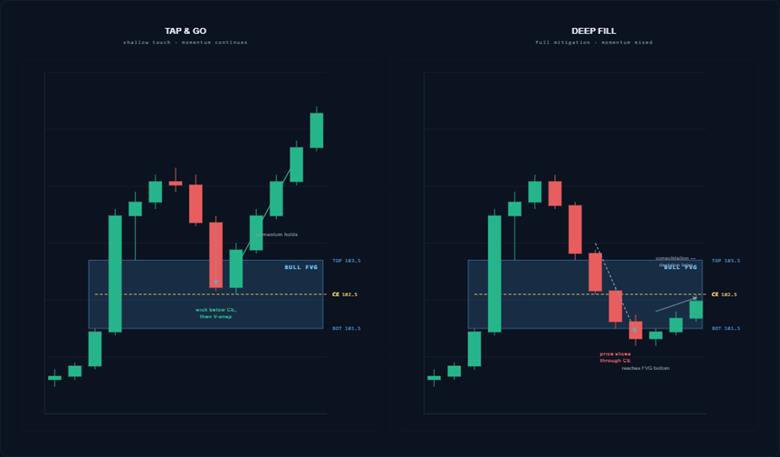
The mistake many traders make is treating deep fill as an immediate failure. A deeper fill is not always invalidation. It may simply mean weaker immediate momentum.
Continuation vs Reversal Decision Framework
When the price reaches CE, the real question is not “Did it touch 50%?” The real question is “Is the market accepting or rejecting this rebalance area?”
Decision checklist:
- Is higher timeframe bias still intact, or has structure shifted?
- Was the original displacement strong and clean?
- Is price reacting at CE with directional intent, or chopping around it?
- Is there fresh lower timeframe displacement in your intended direction?
- Is opposite-side liquidity closer and cleaner than your target?
- Are you trading into a high-risk period, such as major news or rollover?
If the answer to most of these is weak, reversal risk rises. CE does not override context.
Applying Consequent Encroachment in Forex Trading
Forex is where many traders try to use CE precisely, but execution quality depends heavily on session timing and volatility conditions.
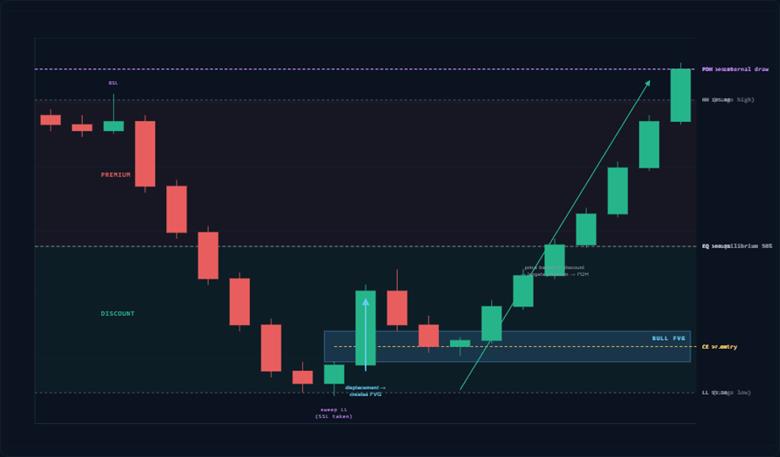
Execution Factors and Higher Timeframe Alignment
Before using CE on a lower timeframe, anchor the setup to a higher timeframe context:
- What is the current draw on liquidity?
- Are you trading towards PDH/PDL (previous day high / previous day low)?
- Is the setup forming in a premium or discount of the dealing range?
- Did the market sweep liquidity before displacement?
A bullish CE setup inside discount, after sell-side liquidity is taken, and with a buy-side target overhead is stronger than a bullish CE setup in premium with no clear draw.
Spread, Volatility, and Risk Considerations
CE provides a precise framework, but Forex execution often lacks this level of precision.
Important Forex-specific risks:
- Spread widening during rollover may artificially move the price through CE levels and stops.
- Session transitions can result in erratic fills and false breakouts.
- News-driven volatility can cause slippage, price gaps, and unreliable confirmations.
- Regime changes may alter the behavior of previously reliable patterns.
Many technically skilled traders struggle with execution timing, despite strong chart analysis.
Reminder:
- Do not treat CE entries the same during calm periods and major news events. major news windows.
- Review the spread and execution conditions before considering a “clean touch” significant.
- Leverage can turn minor execution errors into significant account losses.
Trade Execution Framework Using CE
CE works best when it sits inside a repeatable process. A framework reduces impulsive decisions.
Entry Trigger Models and Stop Placement
Execution workflow:
- State the higher timeframe bias and define the liquidity objective.
- Spot a valid displacement and note precise FVG price boundaries.
- Identify and mark the CE at the FVG midpoint.
- Wait for the price to return during a tradable session window.
- Choose the model: retracement entry or confirmation entry.
- If a confirmation model, wait for a lower MSS/displacement timeframe.
- Place a stop-loss at structural invalidation, not arbitrary pip distance.
- Define partial exit levels and the final target before entry.
- Align stop logic with the setup, not personal comfort.
Aggressive stop model
Place stop-loss below the local reaction low (bullish setup) or above the local reaction high (bearish setup) formed around CE.
| Pros | Cons |
|---|---|
| Tighter risk | Your stop-loss is more likely to be hit during the stages of high volatility or noise. |
| Better risk-reward ratio |
Conservative stop model
Place your stop-loss beyond the far side of the FVG or beyond the liquidity sweep extreme that should not be violated if the thesis is correct.
| Pros | Cons |
|---|---|
| Lower stop-out frequency | Larger stop distance, |
| Smaller position size |
Trading Tip:
If your stop is not tied to structural invalidation, you are sizing a trade without defining what would prove you wrong.
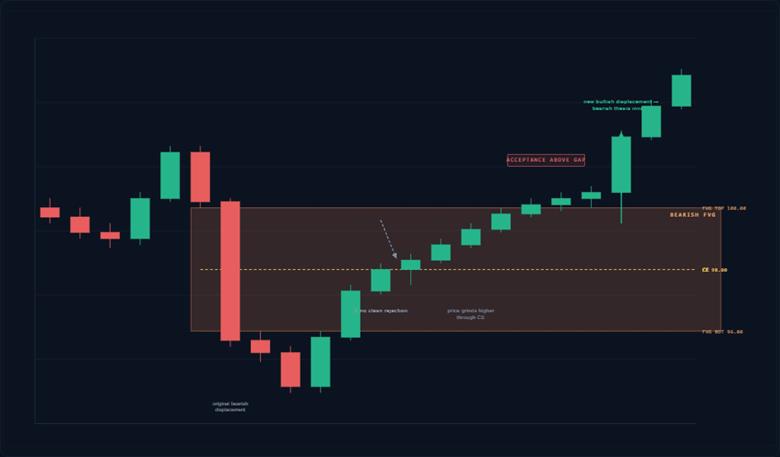
Trade Invalidation: Acceptance Beyond the Gap
A common mistake is calling every move through CE an invalidation. CE penetration alone is not enough.
Practical invalidation is better defined as acceptance beyond the gap. This means price not only moves through CE and the FVG boundary, but also spends time there and builds a structure that supports continuation against your thesis.
Mini Example: Bearish GBP/USD CE Invalidation (text-only scenario)
You identify a bearish H1 displacement after a sweep of buy-side liquidity. A bearish FVG forms, and CE is marked. Price retraces during New York and reaches CE.
At first, it looks like a normal mitigation. Then the behaviour changes:
- Price trades above CE and does not reject sharply.
- M5 prints overlapping candles, then forms higher lows.
- A local M5 swing high is broken upward.
- Price fills the full bearish FVG.
- Instead of dumping, it consolidates above the gap boundary.
- New bullish displacement appears.
- That sequence shows acceptance beyond the gap. Your bearish CE continuation thesis is invalid.
Invalidation should be rule-based and observable, the worst approach is to invalidate based on your own emotions.
Advanced Confluence and Institutional Alignment
CE becomes more useful when it aligns with other structural references. Confluence should improve odds, not justify weak trades.
CE With Order Blocks
If CE overlaps with an order block reaction area, the zone may carry a stronger response potential. The key is sequence:
- Liquidity event
- Displacement
- Imbalance
- Mitigation
Do not force confluence by stacking labels on the same chart. If the order block is weak or the displacement is poor, the overlap adds little value.
CE With Premium/Discount
Premium and discount help frame whether your CE setup is positioned efficiently within the current dealing range.
Examples:
- Bullish CE in discount is usually more attractive than bullish CE in premium
- Bearish CE in premium is usually more attractive than bearish CE in discount
This does not replace structure. It improves trade location quality.
CE With MSS/BOS
BOS (Break of Structure) supports trend continuation. MSS (Market Structure Shift) often signals a potential change in direction on the execution timeframe.
How does this help?
- CE combined with BOS often fits continuation setups.
- CE combined with MSS often fits reversal entries or confirmation after a sweep.
- CE without BOS or MSS is usually just a touch of the midpoint with no edge.
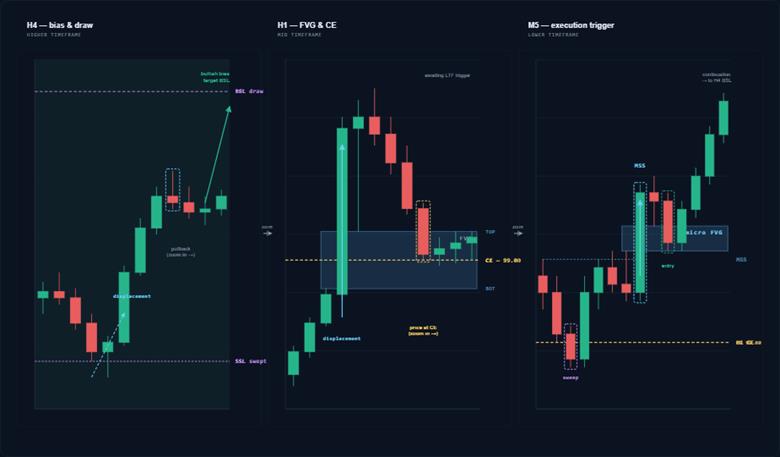
Displacement Strength and Multi-Timeframe Confluence
The most consistent CE setups usually tell one story across multiple timeframes:
A higher timeframe provides bias and a target.
The mid-timeframe provides the FVG and CE location.
A lower timeframe provides an execution trigger.
This is where CE becomes a precision tool instead of a standalone pattern.
Quality Filters for Trading CE Setups
The goal is not to trade every CE. The goal is to filter for the ones with a coherent narrative and executable conditions.
Not All FVGs Respect the CE Level
Some FVGs are low quality from the start. Common weak characteristics:
- Formed during low-liquidity hours
- No clear displacement or structural break
- Immediate overlap and noisy price action after formation
- No obvious liquidity event before the move
When the FVG is weak, CE often behaves randomly.
Common Retail Errors:
- Marking every visible gap as tradable
- Ignoring session quality and spread conditions
- Entering at CE without asking what caused the imbalance
Identifying High-Probability Imbalances
High-probability CE setups often share these traits:
- A clear liquidity sweep before the impulse
- Strong displacement that breaks structure
- A defined external draw on liquidity
- Alignment with premium/discount logic
- Lower timeframe confirmation at mitigation
You are not looking for perfection. You are looking for evidence that the market has a reason to move and a reason to rebalance.
Q: Does a high-probability CE setup mean high win rate?
A: Not necessarily. It means the setup quality is better defined. Outcomes still depend on execution, conditions, and risk management.
Common Mistakes When Trading Consequent Encroachment
Most CE mistakes come from treating a pricing reference as a signal.
Misidentifying the CE Midpoint
Traders often miscalculate CE by using the wrong FVG boundaries, measuring from candle bodies when their own method defines wick boundaries, and marking the midpoint of a broader zone instead of the actual imbalance.
This creates inconsistent entries and invalid backtesting results.
The fix is simple: define your FVG measurement rules once, then apply them consistently.
Treating CE as Guaranteed Support or Resistance
CE is conditional and context-dependent. It can react strongly, react weakly, or fail completely.
If you build your process around “price touched CE so it must reverse”, you are not trading structure. You are trading hope.
Q: Why does CE fail even when the FVG looks clean?
A: Because the market may be re-pricing for a different liquidity objective, or conditions such as news volatility, spread shifts, and regime change may override the expected reaction.
Conclusion
Consequent Encroachment is best used as an execution refinement in ICT terminology. It gives you a precise location within an imbalance, but it does not provide bias on its own.
The edge comes from how CE is combined with displacement quality, liquidity context, premium/discount positioning, and lower timeframe confirmation. That is what turns a midpoint into a tradable setup.
Keep in mind that even technically clean CE setups can also fail because of leverage, slippage, spread widening, session transitions, and news volatility. Market changes and so on.
Treat CE as a hypothesis zone. Define invalidation in advance. Risk is small enough to survive setups that don’t work.